

How to Remove Distracting Backgrounds in Wedding Photos Without Losing Detail
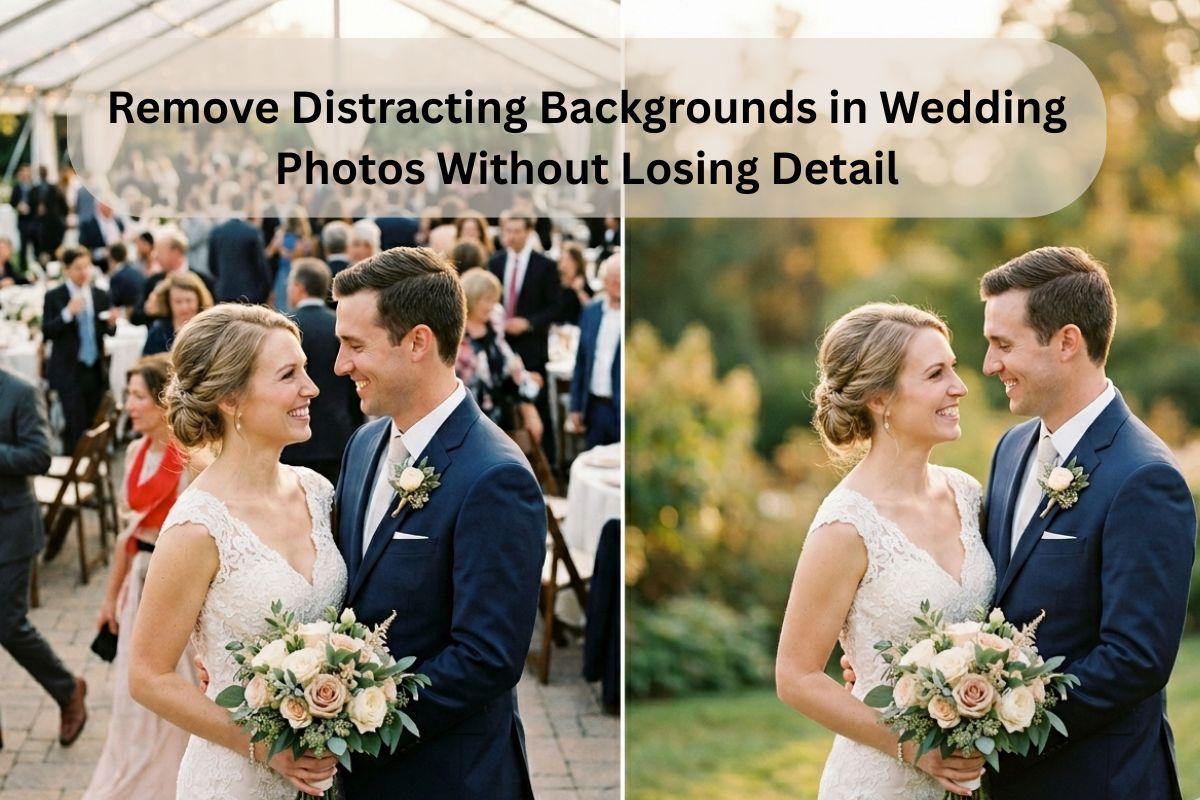
You have finally gotten the most beautiful shot of the couple stoning their first kiss, with the emotion-filled eyes, with the light falling at the right place. However, when you zoom in during editing, you sink. In the middle of the walk is a random guest or an ugly venue sign or a garbage bin sitting directly behind the couple and robbing all the attention of magic you had so much effort to get.
It occurs to all wedding photographers. And the good news? It is completely fixable.
The act of eliminating distracting backgrounds in wedding photographs can easily be considered one of the most common orders in any professional wedding photo editing service, and when it is properly done, it can turn an average photograph into a masterpiece of a gallery. The problem, though, is how to do it without ruining the details that make wedding photographs so valuable: the lacy veil, the delicate curls of the bridal hair, the fabric where the dress is made that is so thin.
Here is a guide on how to do just that.
Why Background Removal Is Trickier in Wedding Photography
The wedding photos do not resemble any other genre. The characters are elaborate, sentimental, and convoluted gowns, hairstyles, and transparent veils all make extraordinarily challenging sides to cut around. An overly serious edit can help the couple appear to be plastered on a magazine cover and glued together.
This is the reason that most professional photographers seek the services of a professional background removal service instead of hurrying to do it themselves. An expert service is aware of the special demands of the wedding visuals, they know how to work with a floating veil when the weather has gone rogue, how to preserve the texture of lace and a full-scale setting when the wall of a crowded venue is used and how to retain a sense of natural intensity in a picture when the background is shot through.
This is why it is never just removal but seamless removal. A good background remover service works with each image one-on-one, and not using a generalized approach to remove the background on all images, which can strip them of the same details that make wedding photos seem to come to life. The background must fade away in the background and the couple must still appear to belong exactly where they are standing natural, warm and real.
This is a matter of time, accuracy and a trained eye to do it right. And regardless of whether you are doing the background removal of the wedding yourself or you outsource it, the initial move towards getting the results that your clients are going to be very happy with is to know what makes the background removal of the wedding so challenging.
Method 1: Photoshop's Select and Mask for Complex Edges
In the case of veiled photos, sloppy hair and flyaway hair, select and mask workspace are your best friend in Photoshop. Select the Quick Selection Tool to coarsely draw the couple, and then change to the Refine Edge Brush to draw the edges of hair and veils. The artificial intelligence in Photoshop will be able to identify the thin strands and isolate them on the background with flawless precision.
Never edit your original file always use a duplicate layer. After selecting it clean, add a layer mask and then either blur the background or make it look as though there is a more flattering scene.
Pro Tip: When finalizing any edge, zoom in to at least 100 percent. What appears clean at 25 percent may appear jagged and unnatural at full resolution.
Method 2: Content-Aware Fill for Object Removal
The Content-Aware Fill is the quickest to use when the issue is not the whole background but instead just an object that causes distraction such as a stray guest, a trash bin, an exit sign, among others.
All you need to do is to use the Lasso Tool to make a loose selection of the object in question and then select Edit followed by Content-Aware Fill. Photoshop uses the pixels around and smartly fills the space. In the case of the majority of outdoor wedding scenes where there are grass and trees or a clear sky, the outcome is astonishingly clean.
On tenacious areas where the fill appears spotty, proceed with the Clone Stamp Tool or Healing Brush to mix all the natural way.
Method 3: Lens Blur for a Natural Bokeh Effect
Often the background is not required to be removed, it only needs to be toned down. In case the location is stunning with some gorgeous architecture or greenery which can enhance the narrative, you can use a Lens Blur filter instead of removing it completely.
This method replicates the effect of a shallow depth of field of a wide aperture lens, in which background blur is pushed out, leaving your subjects at their focused point. The depth map layer can be generated in Photoshop, fitted with an Lens Blur filter, and the focal distance can be changed until the effect is natural and cinematic.
This style is particularly effective in interior receptions where the surrounding decor will provide a warm touch to the picture.
When to Hand It Off to a Professional
These methods are effective, yet are time consuming. It is really exhausting when photographers have to edit hundreds of photos at the same time and the quality should not change throughout the wedding season.
It is there that a background removal service comes in with a difference. This is where professional editing studios, such as Visuals Clipping, come in to offer high-volume wedding photo editing, specific in details, including background cleaning to complete retouching, allowing the photographers to concentrate on their core business, which is shooting photographs.
Even when you outsource some of the editing of your workflow, you can reduce your post-production time at least by 50 percent without compromising the quality that your clients want.
The Golden Rules of Background Editing
You should go through the following quick checklist before you complete any background edit:
-
Never edit the original; always edit a duplicate.
-
Check 100% zoom to finalise before exporting.
-
Switch the direction of light when changing backgrounds.
-
Do not use too much smoothing of skin and edges of fabrics.
-
Provide the original and the edited version to your client.
Also Read: How to Fix Overexposed Wedding Photos
Final Thoughts
The distracting background should never get to be the cause of a beautiful wedding moment being wasted. All photos are worth a second opportunity with the appropriate tools and techniques, be it the AI-powered selection tools or Content-Aware Fill of Photoshop, or a professional service of editing wedding photographs.
The couple believed that you were the one to share their story. Ensure that nothing comes on its way.